If you’re hosting a web page that you intend for anyone else to access, you really should make sure you have an SSL certificate. Nowadays any major web browser is going present a warning to users if they browse to a page without https, and users in many cases will click away or may not know how to proceed. Fortunately, adding a certificate with Lets Encrypt is both free and painless.
(Continue reading…)After setting up MinIO on a public facing web server, one of the first things you will want to do is to secure the web frontend. Out of the box MinIO does not support multi factor authentication. Instead, the product allows you to use a third party authentication service. In this guide we’ll explore the process to do this with Google Cloud Apps and OpenID Connect. It’s relatively painless and I believe should all be doable under Google Clouds free tier.
(Continue reading…)Recently I had been looking at options for storage of PC backups. Currently I use the rather excellent Mac app, Arq, which I use to backup to a local server (via a network share). I also have the software set to do a secondary backup via SFTP to a cloud server.
The limitation with this second backups use of SFTP as a backup protocol is that it doesn’t allow for any sort of routine processing of files from the server itself. For cold storage this is fine. However when I need to validate that my backups are correct, which is scheduled to occur every month or two, the comparison of the checksum for a cloud copy compared to a local copy has to be performed on my local PC, meaning the entire online backup has to be downloaded. This has a significant time implication for verifying backups and also consumes data allowances where a destination measures bandwidth.
MinIO is a free open blob storage solution that implements S3 compatible storage (think Amazon AWS S3). Among other capabilities such as versioning and retention policies, the product allows check-sums for files in a data store to be validated from the server itself. When comparing a backed up file in the cloud to the local copy, only the checksums themselves have to travel over the network, not the entire file. This saves a lot of bandwidth and for my use case this is perfect. Using MinIO over SFTP avoids time waiting for files to download and keeps bandwidth as a minimum whenever I do monthly checks.
(Continue reading…)When working with web based systems where there are multiple instances of the same product, such as development, test and production environments, its often desirable to be able to apply a colour scheme to an instance to distinguish each apart. This isn’t dissimilar to potentially applying different Windows colour schemes to different Windows servers, or to a terminal or SSH client connecting to different endpoints. In some cases a web app will allow you to natively do this via some customisation of say the header, or by applying an entire themes, but where that’s not available Dark Reader is a browser add-on that can help.
As the name implies, Dark Reader is typically used to make light pages dark. Many people find reading on a dark background more comfortable, but many websites today have a single colour theme and do not implement a dark mode (it’s on my todo, but not today).
Dark Reader has a default set of rules that can be applied to darken a page, and this works very well if you just want to force pages into dark mode. However, there is also the option to apply custom CSS on a per site basis which allows for very fine tuned control of the customisations applied to a page. Given the CSS is user defined there’s no requirement to make the page dark. You can, if you want, just use CSS to change elements colours.
The user interface for Dark Reader can be a bit fiddly, but if you’d like to use it to customise the CSS of any page you can do so by following these steps.
- Download and install Dark Reader. It is available for free on the Google Chrome, Microsoft Edge, Firefox or as an (unfortunately) paid Safari extension. Other Chromium based browsers, Brave etc, can use the Google Chrome link generally.
- Navigate to the site to theme.
- If you do not want to make all sites dark by default, in the extension on the Sites list tab, select Invert listed only and then add the URL for your site to the list.
- In Dark Reader, under the More menu ensure “only for www.your-site.com” is selected. Then press the Static button for Theme generation mode. A little orangish pen icon will appear on the upper right of the button. Click this.
- A CSS Editor will open. Ensure your webpage adders is listed at the top and not “All Wbsites”. If all websites is displayed, revisit option 4.
- Enter your CSS for the page. You’ll need to come up with this for yourself, although there may be some online sources with alternative CSS for popular sites. Check the current sites source code in your browser to help you identify CSS to customise.
- Click Apply to preview your changes.
As an example, here’s some CSS and examples of the changes you can produce.
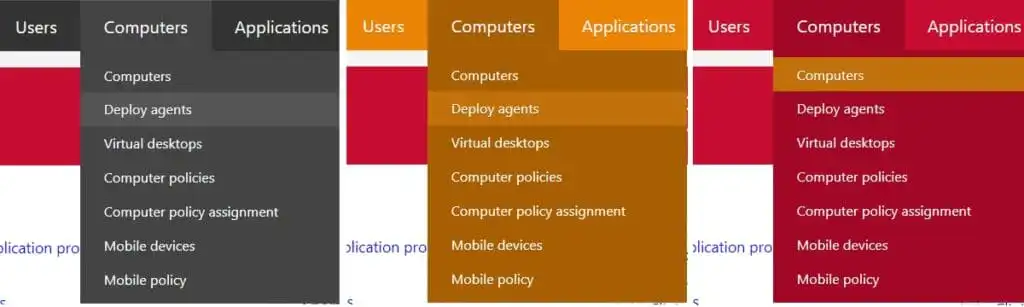
CSS/* Main Toolbar Colour */ #main-menu, #main-menu .menu-header.has-submenu, #main-menu .mega-menu-img-menu-link { background: #eb8405; } /* Dropdown Menu Pane Background Colour */ #main-menu ul, #main-menu .menu-help-short, #main-menu .mega-menu-img-menu-link.highlighted, #main-menu .menu-header.has-submenu.highlighted, #main-menu .menu-help .submenu-no-hover, #main-menu a:hover { background: #a85f03 !important; } /* Dropdown Menu, Hover Over Entry Background Colour */ #main-menu ul a:hover { background: #c2700a !important; } /* Dropdown menu bolded title colour */ #main-menu .mega-menu-title { color: #f2a83f !important; } /* Dropdown menu seperator line colour */ #main-menu .menu-sep { background: #f2a83f !important; }
Original/Production (left), Pre-production (middle) and Test (right) Lastly, it’s worth noting there are other extensions out there that can do this. Dark Reader is one worth looking at however as it’s open source which can be verified to be handling your browsing data in a secure way. For an extension can that access and modify a page, this is always a consideration that should be front of mind.
This article is going to go over the first things I’ll do when logging into a Debian server for the first time. For me, this will be a VPS that has been deployed by a web host, almost always with the latest Debian release. The first things I want to do are update and secure it. Much of should apply to other Linux Distributions.
(Continue reading…)At one client we’ve had some issues with the consistency of dates as displayed in the FIM Portal. On some systems we were getting the desired AU format of dd/mm/yyyy while on others we had a UTC yyyy-mm-dd format being used on user edit forms, request history and other places.
In the past few months I’ve twice encountered an issue where my iPhone had a huge amount of storage allocated to ‘other’ files. You’d normally expect a few hundred megs to maybe a few gigs of storage to be allocated to these files as it’s what non multimedia/applications data gets labeled as in iTunes. It appeared though in my case that toggling Music Match had left my 70GB or so of music orphaned in the ‘other’ files dump as opposed to being listed under ‘music’.
Freeing up this space so I could re-sync my music proved problematic. The Music app showed no tracks available to play nor would selecting or deselecting the tracks in iTunes and re-syncing cause the desired effect. Deselecting music failed to trigger deletions, and selecting music did not cause the existing data on the phone to be recognised as the music that it was.
In the end the best option turned out to be to perform a backup of the phone and perform a restore.
- Plug the phone into a PC with iTunes and perform a backup. If it is not already selected, I strongly suggest that an encrypted backup is done, at least this one time. By encrypting a backup additional data will be retained such as passwords, Health Kit data and other information you likely won’t want to manually restore. Basically at the cost of having to remember a password, you’ll save a lot of effort once the phone is restored.
- Once the phone is backed up, on the iPhone go to Settings and proceed to do a full wipe of both the phones settings and all content (Settings -> Reset -> Erase All Content and Settings). At first I performed just a settings clear and after restoring found the space was still being consumed, so stick to doing a full clear. As long as the backup was successful there’s nothing to worry about. You’ll probably need to disable Find My Phone before proceeding (the phone will prompt if this is required).
- Restore the iPhone using iTunes. This may take a while, but if an encrypted backup was performed in step one there will be a minimal amount of configuration that need to be re-entered manually and you should have retained data in a number of other applications (Health for example). I also found I didn’t need to restore my Google Authenticator settings which was a great relief. If an unencrypted backup was performed, things should still work but expect to lose a bit of data and configuration so budget time to restoring your phone to its prior state.
And thats it! After performing those steps my ‘other’ space dropped from over 70GB to around 2GB, and I was then able to re-sync my music collection fine.