
Since setting up MinIO I’ve been keen to take a stab at setting up site to site replication. Right now I use MinIO for backups, so replication is not hugely necessary as MinIO based storage is only one of multiple layers of redundancy I have, but it was an interesting academic exercise.
This guide will be a bit lighter touch than the guides Configuring MinIO Part 1 (Docker with Nginx Reverse Proxy) and Part 2 (OpenID Connect) that I previously published. The majority of legwork in getting replication going is repeating build covered in those guides. Enabling replication largely just requires linking a second built instance of MinIO up to the first. There are some things to watch out for however.
Build Second Server
The first step to setting up a replication server is to build a second MinIO instance. For this repeat the processes outlined in Configuring MinIO Part 1: Docker with Nginx Reverse Proxy.
- Use a new hostname for this second instance. For me, I chose to suffix the previous subdomains with “-02” (e.g. https://minio-02.mysite.com and https://minioconsole-02.mysite.com).
- I chose to use a new root user ID and password when configuring Docker. Again, it is recommended that the username is unique and unpredictable.
- Ensure the root user is initially enabled so you can log into your console to complete the rest of the guide. The root users API login can be disabled via Docker-Compose once the replication is in place.
Once built, start your new MinIO instance and log in using the initial root login. Do not add buckets or customise roles or other config not noted bellow in the new instance.
Configure OpenID Connect
MinIO replication requires that you use the embedded MinIO Identity Provider, or an external one. The steps should be similar for other providers, but I’ll assume that you followed Configuring MinIO Part 2: OpenID Connect when building your initial server and that Google Cloud is being used as the identity provider.
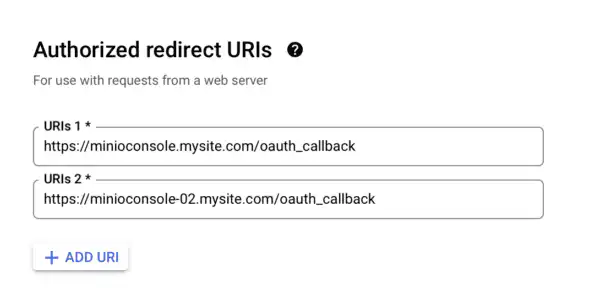
The new server needs the exact same OpenID configuration as your initial server. Start by logging into Google Cloud Console, and using the navigation menu (top left) browse to APIs & Services -> Credentials. Open your existing MinIO credential (OAuth 2.0 Client IDs). Add a new Authorized redirect URIs for your new MinIO instant (e.g. “https://minioconsole-02.mysite.com/oauth_callback”). Save the changes. If you haven’t recorded it previously, note the Client Secret displayed on this page, as it will be needed in the next step.
Back on your new MinIO instance, navigate to the OpenID section and add a new configuration.
- Configure the exact same Identity Provider on your second MinIO instance as is used on your initial one. Most settings can be copied via the UI.
- You will need the Google Cloud Client Secret from the previous step.
- Do not set the Redirect URI to match your new instances hostname. This must match the original MinIO instances value, as with every other setting. (Yes, this is initially counter intuitive but will be addressed in the next point.)
- Ensure the following two items are enabled. If they are not already enabled on your initial MinIO instance, you will need to apply these changes to your initial server also.
- Claim User Info -> enable
- Redirect URI Dynamic -> enable
About Redirect URI Dynamic
For the MinIO replication to succeed, the Identity Provider configuration must match exactly between servers. In my previous guide I did not enable Redirect URI Dynamic as this was not required with only a single server being used. With replication failing if Identity Provider information is inconsistent between instances, it is necessary to have your new instance use a Redirect URI that is the same across MinIO servers. The issue is that post login via Google’s Identity Provider, you would be redirected to the initial MinIO instance regardless of where login was initiated from.
Setting the Redirect URI Dynamic will allow the URI to be dynamically redirected based on the server initiating the login request. Effectively it overrides the hostname from the Redirect URI value.
About Claim User Info
Less essential, but enabling the ‘Claim User Info’ option will prevent a later replication issue that will occur if this is not enabled. Without the setting, you may have some user synchronisation failures between your MinIO instances. When debugging this I identified that in my case this was temporary credentials that appeared to be tied to my Identity Provider login, which until now had no permanent account associated with the user. Enabling this setting resolved that issue.
Update MinIO Location
One final change I needed to make was to set the location of my second MinIO instance to match the location of my initial instance. The location appeared in Policy configuration and if mismatched, caused replication setup to fail.
After replication was completed I was able to change the location in the settings of my second instance, with no noticeable ill effect.
The location value is found in the MinIO settings section.
Enable Site Replication
The next step is to enable replication. Configuration from your old MinIO instance will be preserved and replicated to your new instance. If you followed the above instructions, your new instance should be in its default state other than the identity provider and location settings, so no data loss will occur on this instance.
On your original MinIO Server, first open your docker configuration and re-enable the root user. Either comment out the line disabling the login, or set the value from ‘off’ to ‘on’. Restart the container.
Log into the initial MinIO servers web console and navigate to the Site Replication section. Click the link to continue setting up replication.
When presented with the setup page, add the details for your MinIO instances. The hostname should be for the API of your MinIO instance, not the console. The credentials are the root user account as configured in your Docker-Compose config file. You can copy and paste for the initial server, but annoyingly peer servers in my testing would not accept pasting of credentials in either Safari or Firefox and needed manual entry.
Submit the changes when done.
If you get a success screen, then well done. You can visit the ‘Site Replication’ screen to check on the status of replication. Note that it may take some time for the initial replication to complete, so do not be alarmed if you see any errors.
Troubleshooting
If you get errors, here are some suggestions based on things I had to look at:
- A red error bar at the top of the screen will inform you rather explicitly if your root users credentials are invalid. If you get this, ensure the account is enabled on both MinIO instance and credentials entered correctly.
- If the red error bar has a message concerning mis-matched configuration, you’ll likely find the error message is truncated and hard to read. Hovering over the message will show the full text, but this isn’t especially useful for identifying the mismatch. Instead, in your browser right click the error message (before it disappears, otherwise resubmit the request) and use your browser’s equivalent of “inspect element”. Expand the HTML element until you see the full error message, and copy this.
Paste the error message into a text editor and split the configuration between the original and the new servers config to compare. Identify the mismatch and correct this. A DIFF tool might help here. - As noted, the Redirect URI for your OpenID configuration must match between servers and you should enable the Dynamic URI Redirect option on both servers.
- The server location in my instance needed to match between servers.
As I could not paste credentials into the peer field, it would be a massive burden to need to re-enter the peer credentials each time I corrected something. If you need to make changes, open up a new tab to do so in the new tab. This will allow you to navigate back to the tab with the filled out replication config and resubmit it without re-entering everything.
Cleaning Up
Hopefully replication is enabled now. The completion of this can take some time. You can check the status of replication from either server under Site Replication -> Replication Status.
If after a while you have outstanding replication errors, I had success by stopping my docker and launching with “Docker Compose Up” (no -d). The console output when run this way in my instance included replication issues on the output.
If you need to force replication of old files that were on a node before the replication was set up, try the following using the MC tool:
./mc replicate resync start {server-alias}/{bucket-name} --remote-bucket arn:minio:replication::....Replace the {server-alias} and {bucket-name} with the source details. The remote address is the string displayed in the buckets replication settings from the MinIO Console.
After everything is working, open the Docker Compose config file on both servers and again disabled the root users API authentication and restart the container. Disabling root does not prevent the replication from occurring. As per the MinIO documentation a service account under the root user has been generated to perform replication and is not impacted by the parent being disabled. See here and here (“Site replication adds a svcacct under the root user of each site to perform replication activities”).
Closing
Site replication should now be occurring. Upload some data and check that you see expansion on both of your instances. If you have buckets that you do not want to replicate, you may need to manually disable replication as it was probably enabled automatically for all buckets.
If you have followed my guides, then you’ll be aware I have use a single disk setup for each node. This is not recommended for production use. For high availability at a node level at least four disks are recommended. For my personal use this isn’t a concern and within my failure tolerance, but keep this in mind if you have important data.
I’ve found replication to be a fun thing to implement. At a later point I plan to look at configuring the reporting via Prometheus.
Update: I have now added Configuring MinIO Part 4: Prometheus Reporting