
Installing a Kenwood Head Unit in 2012-17 Honda CRV
Recently I installed a new head unit into a 2013 Honda CRV. The following is a quick overview on the steps I undertook to help anyone that may also want to do the same. This isn’t a complete step by step guide, but some high level pointers that might make the process easier for someone else down the line complemented with some videos I found useful.
Background
I acquired the second hand CRV which has replaced a Ford Fiesta as my daily drive. With the car came the opportunity to install a headunit that’d give me access to Apple Carplay (or Android Auto) which while possible on a Ford Fiesta, would have been a significantly bigger hassle thanks to how the Fords centre dash is configured. Having CarPlay has been somewhat of a pipe dram of mine ever since the technology became available nearly a decade ago.
Head Unit
While this won’t particullarly change the guide, as some background I settled on a Kenwood 8521s headunit. It had a good balance of affordability and robust capabilities and is wireless CarPlay compatible. Unlike some wireless CarPlay units, it can also still do CarPlay over USB, something that would become useful as I became aware of the occasional wifi related issues that CarPlay can experience in some situations.
The follow-up was the Sony XAV-AX6000, which looks to have a sleeker interface than Kenwood’s rather dated UI along with a robust feature set, but multiple reviews noted the display doesn’t perform well in sunlight.
Other equipment
Cabling Kits – To allow a new head unit to interface with a manufacturers car, a series of adapters and cables are needed to convert signals and controls used by the OEM head unit to the aftermarket head unit of choice. This includes aspects such as audio, power as well as any steering wheel controls. For my Australian model vehicle, and the head unit selected, the only applicable options appeared to be the Aerpro harness and adapters.
For newer vehicles, and possibly for the US market more specifically, the iDatalink Maestro series seems to be very prevalent and may be the correct choice in place of the Aerpro. My combination of vehicle and head unit weren’t supported however by the device. One advantage appears to be that Maestro has tighter integration with multiple head units and will make many data points relating to the car accessible through a compatible head unit. This is something I did not get with the Aerpro, but the core entertainment functions work just fine.
Whichever option you choose, make sure you have confirmed both the car and head unit are supported and that you have all the required cables.
Fascia Kit – The built in Honda head unit is not a standard double-din size. As such, as fascia kit is needed to allow an after market unit to blend in seamlessly as well as give the unit something to mount to. In my case Aerpro also offered the fascia kit.
Trim Tools – To make removing the existing head unit easier and to do so without damaging the finish of the car, a set of trim tools is recommended. I used a relatively cheap set I picked up on Amazon.
Philips Head screwdriver – You’ll need a Philips head screwdriver to remove a small number of screws.
Torch or Headlamp – I found having a light source made the install much easier, especially when looking to install the GPS unit deep into the console. In my case I used a cheap headlamp which kept my hands free.
Cable Ties – makes life a lot easier when dealing with any excess cable.
USB-C extension cable and HDMI cable – possibly needed if you want to use these cables and/or want to route the short included USB-C cable to the centre console. For my head unit the HDMI cable needed to terminate in a male micro-HDMI port that had a profile that could fit with the headhunt with the retention bracket attached.
High Level Process
I’m not going to go into every detail on the install, but will provide videos I found very useful. Instead I’ll go over some pointers I came across that are easy to miss or are learnings from experience.
Disconnect the Battery
Very important is to disconnect the battery. It’ll prevent risk of shock. If you need to run a microphone as I did up the A Pillar (side pillar), it’ll also prevent the airbags being engaged at any point.
Removing the Existing Head Unit
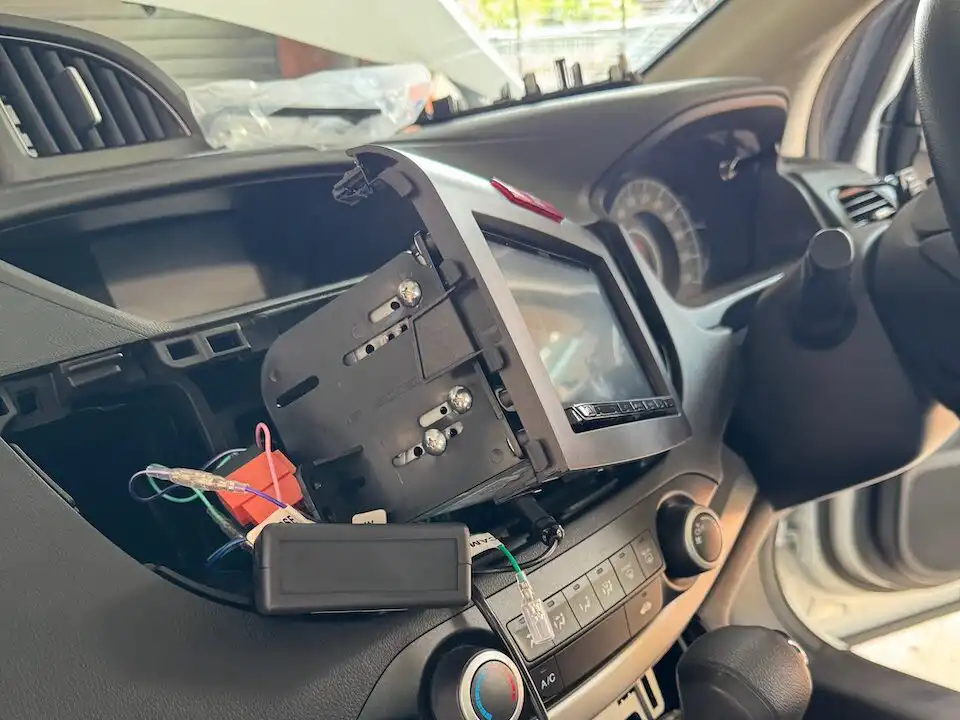
This video describes it as well as I could. Note that removing trim pieces and the exiting head unit does need a bit of force. Furthermore be aware that one of the headunit cables has a rather fiddly catch to it. Take your time when disconnecting the cables.
Mounting the GPS unit
The Kenwood head unit comes with an external GPS unit. Yes, while your phone has GPS built it, it is recommended to install the standalone one. It’ll firstly save your phones battery, especially if going wireless, but it’s also used by the head unit to determine if the car is moving or not. Without this you are dependant on the vehicle speed pulse feed to detect motion, and without either connected I believe navigation simply won’t be available via CarPlay.
The Kenwood documentation suggests that the external unit should be mounted on top of the dash. However, many people suggested they’d had success mounting the GPS unit as high as possible under the centre console, in a spot where only plastic of the dash or glass of the windshield would be sitting above the GPS unit.
The photo bellow shows a spot that I found to be a good place to place the GPS unit, which is out of the way, relatively parallel to the ground and has no metal above the GPS unit to hinder any satellite signal.
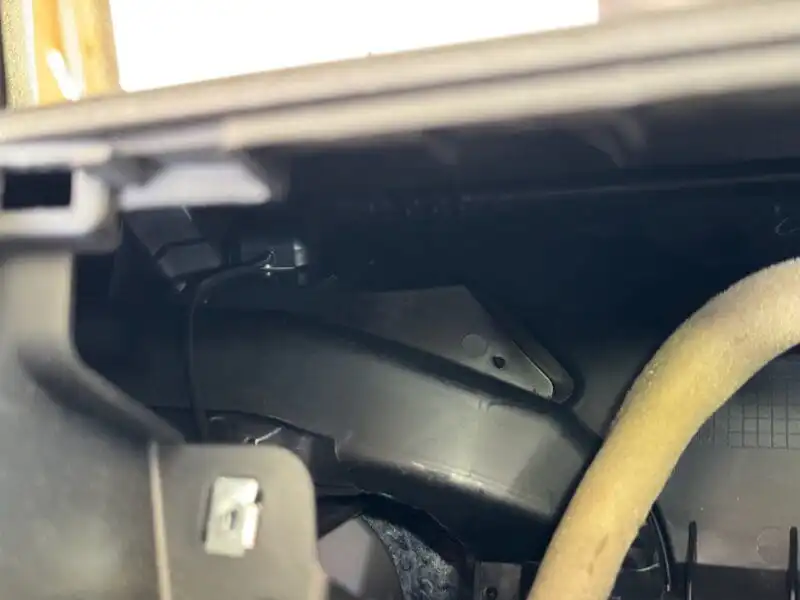
In my experience this spot works very well and keeps everything out of sight. While its a bit of effort to get the unit in, its not significantly more so than the cable management that might be required to mount on top of the dash cleanly.
Remove the top display as per the instructions in this video.
External Microphone Mount
To the best of my knowledge, my Kenwood head unit will neither use the cars existing microphone for voice commands or calls, nor will it use the phones. I believe that audio input requires that the included microphone be used.
The easiest place to install the microphone that people reported success with is to attach it to the steering wheel itself in front of the instrument cluster. This is very close to the head unit itself and reportedly is an easy cable run. I personally decided not to do this as it put the microphone close to the driver, but not the passenger if they need to use voice commands, and also because I didn’t want to constantly see the microphone.
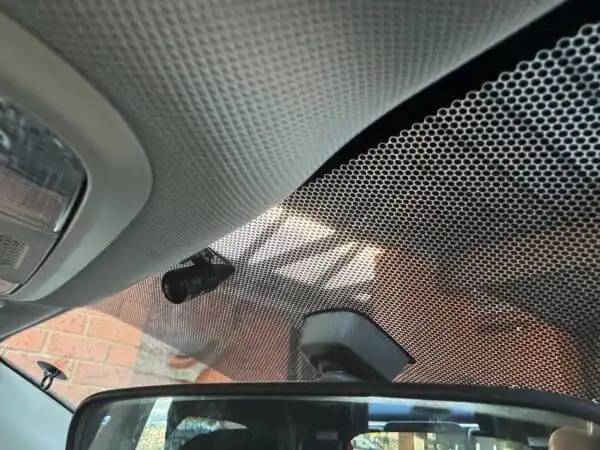
Instead I installed the microphone as pictured near the rear view mirror. By padding with some 3m padded tape (type used for furniture footings) and working the clip in under the roof lining, the microphone is very well secured while barely being exposed when seated in the car. Placing the microphone central means that the passenger can use it too, and it is possible to pivot the microphone if needed.
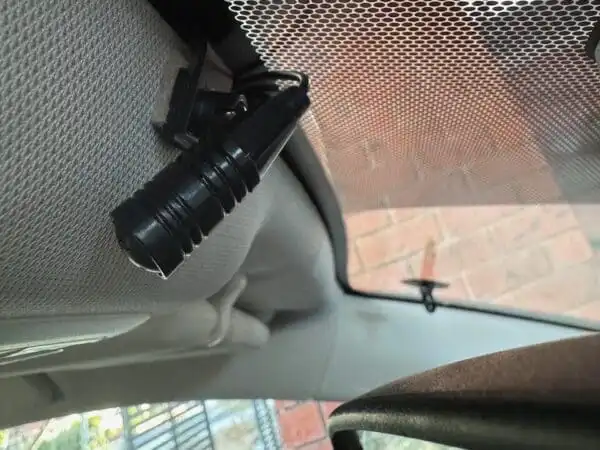
To run the cable, it needs to be tucked in under the trim. This is easy enough for the roof, just push it in and it’ll disappear from view. If you want, use a trim tool to help push the cable well out of the way. I would also leave a bit of extra cable as slack in the roof incase you ever need to disconnect the mic or move it slightly. Don’t worry, the head units ship with a long enough cable.
When it comes to the A-Pillar, some people just push the cable under the plastic trim. The problem is that with an airbag in the pillar, any loose cables can interfere with the airbag system and you don’t really want the cable being launched during an accident. Instead, with the power off I would suggest taking the time to remove the trim entirely and to secure the microphone cable in to the exiting cables via cable ties (see the red cable ties). This will ensure the cable won’t be caught if the airbags ever needed.
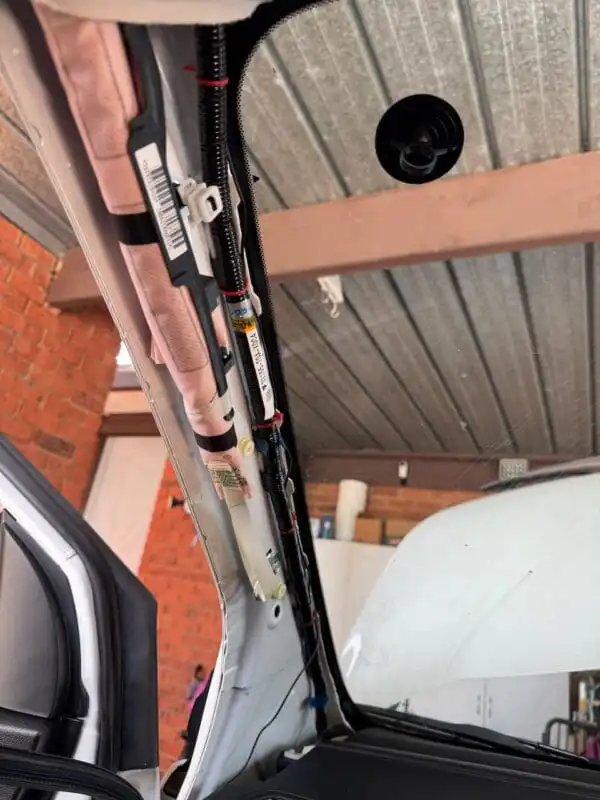
I deliberately routed the cable down the passenger side A-Pillar as opposed to the drivers side for two reasons. The first is that the cars fuse is on the driver side. When I go to install a dash cam in the future, I’ll need to hardwire that and therefore want to go down the driver side A-Pillar at that point. Using the passenger side spreads the cables hiding in the trim. Secondly it’s super easy to pop the passenger side glove compartment out and run the cable to the head unit above/behind that glove box. No need to worry about routing past the steering wheel and the many other cables on the drivers side. Just be sure to keep out of the way of the front passengers dashboard airbag.
To pop open said glove box, open it fully and to the side you will see a small retracted arm. Push down on this to pop the arm off, and the glove box will then open much further. Behind here is also the air filter if you ever want to replace that.
I’ve found this roof placement for the microphone yields excellent results.
Bluetooth Module
There is a cable to attach the bluetooth module in the harness that is longer than many other included in the cable kit. I however found documentation on where this is hard to locate and I wasn’;’t initially sure what to do with the cable. Turns out a bluetooth module sits bellow the gear lever and is accessible vis a small panel underneath the lever, on the passenger side. With this panel removed the bluetooth module is visible but still hard to access. When installing I removed the trim around the gear level by putting my hand into the hole exposed by removing the side panel first, and then pushing up.
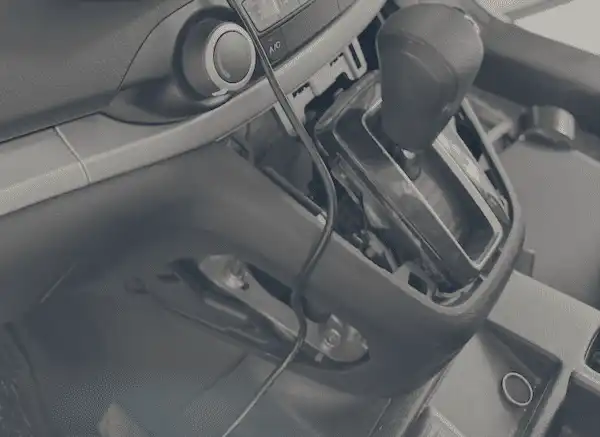
With this trim off was able to get better access to the bluetooth module in order to connect the harness cable. Look for the large black box.
Harness Connection
Unfortunatly I didn’t get any great pictures, but when it came time to connect the main harness and the t-harness to the cars cables, this is the result.
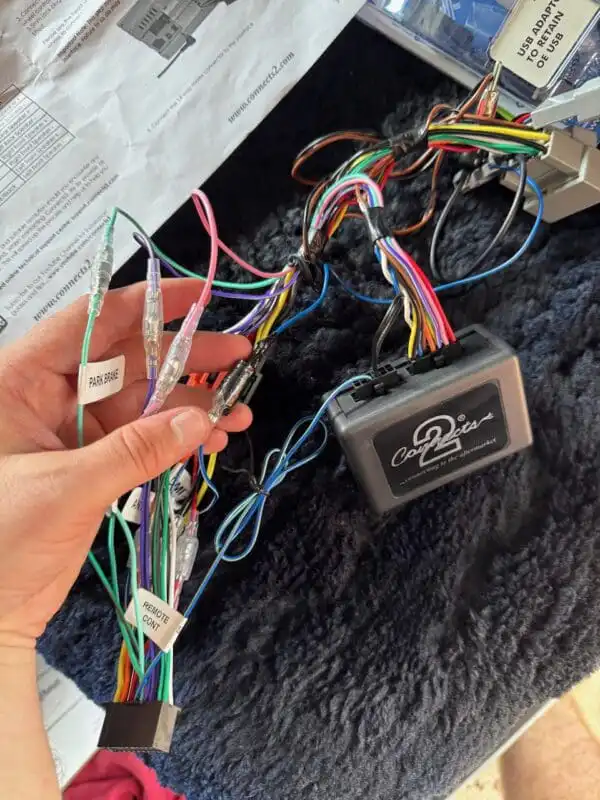
The main thing to note is that the various colour cables were matched up such as park brake (teal), speed pulse (pink), reverse sensor (purple). Most of those are self explanatory. When it came to the pink cables, from memory one was labelled VSS (for vehicle speed sensor) and the other Speed Pulse, so be aware of that potential labelling peculiarity.
For the antenna cable, I connected the jack cable to the head unit and also the blue and white 12v cable on the T-Harness.
See this video for a good guide on cabling the harnesses up. This is for a different model car/head unit, but the principals apply.
USB-C Cable
The Kenwood unit came with a USB-C cable. As the head unit is wireless carplay compatible, I initially thought I’d never use this cable so I attached it but left it loose in the passenger glovebox for the odd time I might want to do a firmware update. I have since discovered that CarPlay has a common issue where in some spaces the WiFi signal required for Wireless Carplay to work gets saturated and CarPlay will stop working. This seems to be common and it seems to generally occur in the same location, if you experience it. For example I get this in my work car park. Some people get it on a highway when passing some form of fixed wireless antenna, etc. The point is, wireless carplay is not 100% reliable and you may want to retain access to the USB cable.
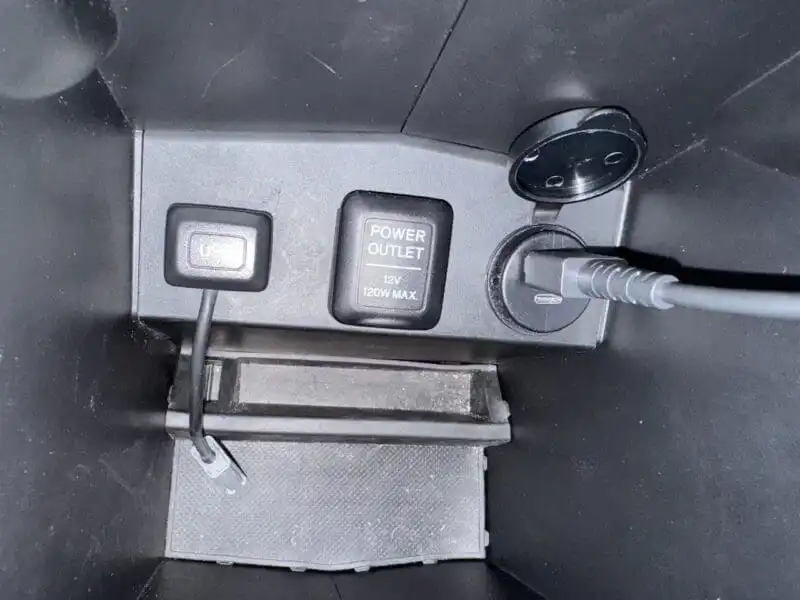
You could leave the USB-C cable terminated in the glove box as I had it initially, but I later opted to run the cable to my center console where I installed a new USB-C port. To do this I removed the rubber liner in the center console which exposed two screws that allowed me to remove the panel holding a power outlet and USB-A ports. I could then feed a USB-C cable down to the base of the car and by cramming my fingers between the floor and the centre console, was able to get a hold of the cable and pull it out under the front passenger seat.
With the cable exposed I then ran it down the side of the centre console, using a trim tool to push the cable back in under the trim as I went. I then fed the cable up the centre dash, taking advantage of the panel removed near the passengers foot where the bluetooth module sits. An additional larger passenger panel can be removed on the inner side of the car with the removal of some plastic clips (with a flat head screw driver), which makes running the cable easier. Removing the glovebox helps additionally getting the cable up to the head unit.
This all is likely to require a USB extension cable, so factor that in. I then used this USB adapter on the centre console, attaching by drilling a hole. Make sure you do not go too close to the edge as it’ll be hard or impossible to re-attach the panel with the power adapter installed. I barely left sufficient room with my own install and at one point thought I’d have to drill a second hole.
The power adapter/hub option I chose also supports HDMI, which I also elected to run. This HDMI cable worked well with the head unit and was about $100AUD less than the Kenwood branded cable. A small amount of padding may be needed when attaching to the head unit as it’s not 100% flush. I elected to tie a small hair band around the cable end to do this. This padding stops the cable sliding back and forth, after the cable retention bracket is attached. A F-F adapter was also required to connect to the output.
For the choice of USB-C cable, I used the one included to connect to the headunit. The head of the cable is especially sized to fit with the retention bracket installed. From there I used a 2m extension cable to get to the centre console.
As a final point. There is an aftermarket USB Aerpro adapter cable that allows the exiting centre console USB-A cable to be used by the head unit instead, I purchased the cable but never used it. The existing cable is run to then top most display in the car, not the centre console, and by default remains connected to that unit. I elected not to remove the cable in case I ever had a need to connect any USB device to that display, such as to put custom backgrounds up there. I’m not sure, but it’d also not shock me if the cables used for any firmware updates to that display.
Testing
Before pushing the head unit in fully, once wired up, reconnect the battery and give it a test. Make sure there’s no lose cables and everything works. Once happy, disconnect the battery again and only then complete the install. Saves time should you need to adjust anything.
Take Your Time
Last piece of advice is to not rush the install. Take time to ensure things are attached properly and to avoid scratching any of the cars surface. Consider using tea towels and the like to pad anything, especially the head unit display, as you go.
Conclusion
That’s some pointers and links that will hopefully help. I absolutely love having the Kenwood in my car. As I alluded to, the one thing I wasn’t prepared for is the location specific drop outs of wireless CarPlay. Other than this, the Kenwood 8521s has been amazing and I highly recommend it.