
On the weekend while updating my UnRaid server, the system failed to POST following a reboot. CPU fans would spin up at power on, but there was no video signal, USB peripherals (keyboard) being supplied power or hard drive spin-up. My particular Gigabyte board, an older Z170n-WiFi, has previously had issues with my RAM (Patriot Viper Steel DDR4 32GB (2x16GB) 3200MHz PC4-25600) that required some manual OS tweaking and it appeared my old settings had been lost. Looking online other people have had similar issues. Here’s what worked for me.
Starting out, I’m reasonably confident my RAM is OK. I have run memtest on this RAM for multiple days previously and it completed just fine. I’m less confident in my motherboard which is a few years old and a revision 1.0 of a board that got later revisions.
As my motherboard is a number years old and there was no obvious reason for the PC to fail the initial reboot, I first decided to swap out the CMOS battery for the first time in that boards life. Knowing my PC was dependent on some manual RAM settings being applied, I felt there was a decent chance the BIOS had lost config across the reboot which was now contributing to the system not passing POST. I had a CR2032 laying around so rather than purchase a battery with pre-attached motherboard headers, decided to just rip the connectors from the existing installed battery, taped those nice and tight to the new battery and connected this to the motherboard.
Next was to get the PC to a BIOS. Initially clearing the BIOS by bridging the CMOS reset headers while the PC was powered off and unplugged was not effective. On boot I’d still get a black screen. I found that it was only after I removed one of my two RAM sticks that the PC would boot to BIOS after clearing the BIOS. Didn’t matter which RAM stick I removed, as long as only one was in the PC at startup following a CMOS reset.
On getting into the BIOS I then had to perform the following steps to get the PC booting consistently with my RAM.
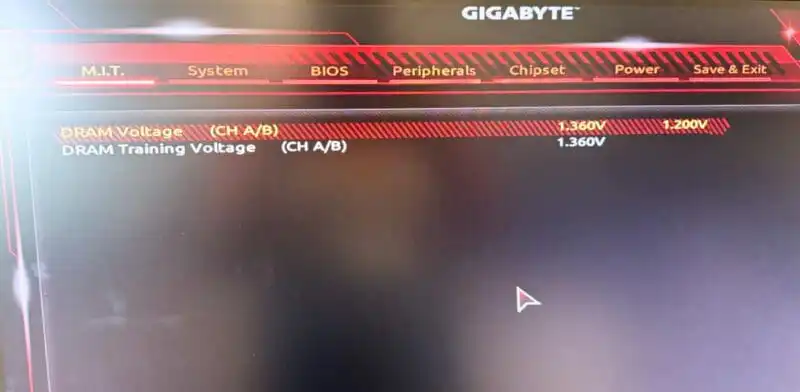
In the advanced memory voltage settings, set the RAM to 3.5v or above for both the ‘normal operating and the test’DRAM Voltage’ and ‘DRAM Training Voltage’. For my motherboard the voltage rounds up to 3.6v, which is fine.
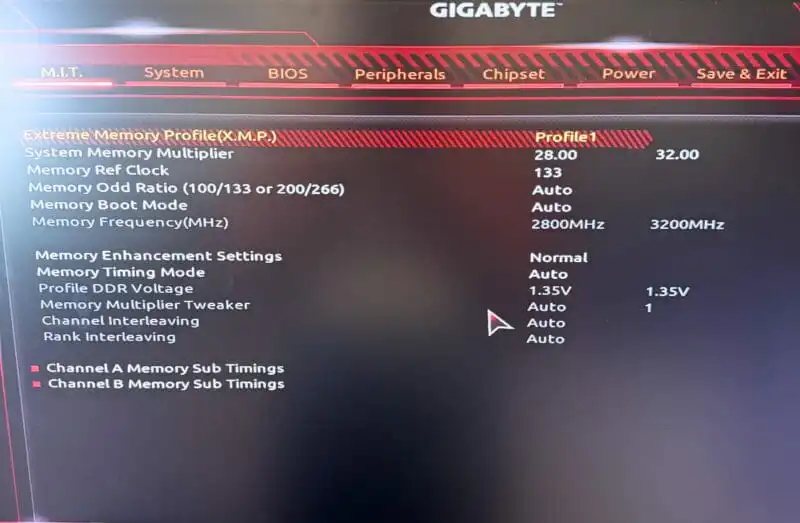
Ensure in the memory settings that XMP is enabled. My Motherboard has a single profile, called Profile 1. This is required for the memory to get the extended voltages.
I had to run my RAM at slower speeds. I set the System Memory Multiplier to 28.00 and the Memory Ref Clock to 133. All other settings are left as default, and the system reports the RAM is running at 2800MHz. Fine.
On reboot the PC would boot ok. I shut down, added the second RAM stick and across multiple reboots the PC would now start up OK.
I’m keen to stress that my use case for this PC is to run UnRaid, a headless NAS. RAM performance is not super important for me. In step 4 above I arrived at a multiplier and reference clock that was reliable and stopped there. People who care about performance may want to be more aggressive with testing values, or to manually tweak other RAM settings. Just be aware you’ll very likely get to a point where your system again can’t boot, and you’ll need to repeat steps 1-3 again.
I apologise for the poor photos, but at the time I took them they were for my records and I hadn’t intended to publish them. As the PC is headless typically, I’ve decided they’ll have to do.